POMBA
Children's
Clothing & Equipment
Sale
%20(1).png)
Tags
Seller Tags
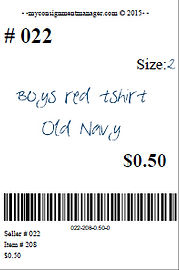
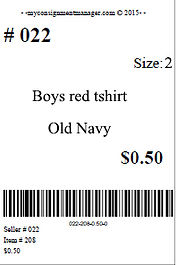
The information on a seller tag includes the seller number, item number, price, size, description, barcode, and whether or not the item with be discounted and/or donated. Each item you sell MUST have a sale tag attached to it. Only POMBA-issued tags created with the MyConsignmentManager software system can be used.
When an item is sold, the tag is removed at checkout and scanned. The data from the barcode (seller #, item #, price) is entered into a database program that calculates the totals for each seller. Within 24-48 hours of the sale, sellers will be able to check their inventory online to see what items sold and their approximate profit.
Creating your Tags
You must have access to a computer, printer and Internet with up-to-date browsers. You should also ensure that the language setting for your browser is set to English. If it is set to French, you will have trouble with the prices due to the commas for decimals in French.
To begin, "Login" to your account on our MyCM webpage: www.myconsignmentmanager.com/pomba
Sellers have the choice of creating either BLANK or DETAILED tagsKeep in mind that the more information saved in your inventory about your items (particularly the category), the better we are able to provide insight on what items sell best.
IMPORTANT!!: Due to the additional time needed both during the sale and after to reconcile these tags, “Duplicate tags” as well as “Items not in inventory” totalling less than $10 will no longer be paid out to sellers. “Duplicate tags” or “Items not in inventory” totalling more than $10 will be subject to 50% commission. Please make sure to follow proper tagging procedures and detailed instructions on how to avoid “Duplicate tags” and “Items not in inventory”.
Creating Detailed Tags
These tags are created one at a time on the computer, typing in full detailed descriptions of each item. This creates a tag that is clear and easy for buyers to read. While this may take a little more time in front of the computer, once the tags are printed, your work is done.
1. Go to Enter Items: Either click on the "Enter Items" link provided on the screen or go to the Enter Items tab on the orange bar at the top.
2. Price: The price can be selected either by mouse or by typing in the digits. Prices start at $0.50 and go up by $0.50 increments to a maximum price of $500.
3. Description/Brand Name: Type the manufacturer or brand name being careful to stay in the box provided (i.e. Carter’s, Graco) as well as a description of the item - grey sweater, corduroy pants, dress shoes, etc. You can also list the condition in one of the description lines (i.e. "New" or "Gently Worn"). Try to not use capital letters as they take up more space allowing for fewer characters per line. The system will prompt you if your description is too long for the tag.
4. Size: Choose the size either with your mouse or by typing in the first digit of the size you want (which is faster). You can choose “not applicable” for items where a size is not necessary. You can also choose “blank size” and then nothing will appear for the size on your label. If the sizes available don’t match exactly the size on the item, choose the closest size. Or use “blank size” and manually write the size on the label.
5. Category: Choose the Category either with your mouse or by typing in the first letter of the category you want (which is faster). Take a few moments to familiarize how the categories are set up. If you don’t know the category, you can choose “Miscellaneous” or even “blank category”. If you choose “blank category”, nothing will show up on the label. If you would like to suggest a category you don't see listed, email us.
6. Allow Discount: This box should be clicked if you would like this item to be discounted 50% during the final hour of our sale from 1pm-2pm. Sellers can pick and choose what items they want to discount and what items they don't.
7. Allow Donate: This box should be clicked if you would like this item to be donated at the end of the sale if it is not sold. If you don’t want to return at the end of the sale for your unsold items, then choose this for all items you are selling.
8. Number of Tags at this price: Typically 1, but it is possible to have multiple items with much of the same information, particularly if it is quite generic. (ie: 12-18 month Carters fleece sleeper)
9. Click Add Items: The system will add the item(s) to the screen for you to view and print.
Creating Blank Tags
This is a quick and easy way to create many tags at one time at different price points. You will spend less time in front of the computer, but remember you will still need to take the time to enter the missing information by hand while actually tagging your items.
1. Follow the instructions above: At a minimum your blank tags will need to include price. It is also recommended that you make the proper notations for discounting and/or donating as those indicators cannot be handwritten.
2. Price: The price can be selected either by mouse or by typing in the digits. Prices start at $0.50 and go up by $0.50 increments to a maximum price of $500.
3. Description/Brand Name Fields: Leave blank.
4. Size: Choose the size or leave blank.
5. Category: Choose the category or leave blank.
6. Allow Discount: This box should be clicked if you would like this item to be discounted 50% during the final hour of our sale from 1pm-2pm. Sellers can pick and choose what items they want to discount and what items they don't. When creating blank tags it may be helpful to create some "discount" and some "no discount" at each price point so you can decide as you are tagging.
7. Allow Donate: This box should be clicked if you would like this item to be donated at the end of the sale if it is not sold. If you don’t want to return at the end of the sale for your unsold items, then choose this for all items you are selling. When creating blank tags it may be helpful to create some "donated" and some "not donate" at each price point so you can decide as you are tagging.
8. Number of Tags at this price. Using the Power Tagger, enter the number of tags you would like to create with this exact same information. A typical seller would need many tags at the lower price points of $0.50 to $5.00 and much fewer tags at the higher price points.
9. Click Add Items. The system will add the item(s) to the screen for you to view and print.
When creating blank tags to use later, you would create many tags at different price points so the above instructions would be followed for all the price points you want to use. You can log back in at any point before the sale to create more tags. So don’t worry if you run out and need more.
* $0.50 - 16 tags
* $1.00 – 32 tags
* $1.50 – 16 tags
* $2.00 – 32 tags
* $2.50 - 16 tags
* $3.00 – 24 tags
* $3.50 – 16 tags
* $4.00 – 24 tags
* $4.50 – 16 tags
* $5.00 – 16 tags
* $6.00 – 12 tags
* $8.00 – 12 tags
* $10.00 – 8 tags
* $12.00 – 4 tags
* $15.00 – 4 tags
* $18.00 – 4 tags
* $20.00 – 4 tags
* Higher numbers – as needed
IMPORTANT!! You are allowed to enter up to 1000 items for each sale.
Additional Information:
Editing Tag Information: Previously entered items can be edited at any point. Click Manage Items. Check the box to the left of the item you would like to edit and click "Edit Item". From here, you can change the price, size, description, and category.
Editing Donate/Discount Option: From the "Manage Inventory" page check the box next to the item you want to edit and click the icon for the appropriate action (Mark Discounted / Mark Not Discounted / Mark Donated / Mark Not Donated).
You can perform the same action on multiple items at once by checking all corresponding boxes/items.
IMPORTANT!!: If your tags had already been printed, print the new version you just edited/created and destroy the old one. You cannot use the old tags for something else. Each tag has a unique Item # and cannot be scanned more than once. Editing the tag information does not change the Item #. See the Printing Tags page for more information.
Removing Items: You can remove items at any time by checking the box next to the item you would like to delete and clicking "Remove Item". The removed item will not count toward your 1000 item total and will no longer exist in the database. Any tag printed before the item was removed will not be recognized when scanned.
IMPORTANT!!: In order to prep our database, the system is LOCKED 48 hours prior to sale day. At this point sellers can still print, but no new tags can be created and existing tags cannot be edited.
Now you are ready to print ...
A typical starting point for new sellers would be to create the following
Note: tags print out 8 per sheet of cardstock
